How to Manage Your Organization
On this page you will find a detailed guide on how to successfully manage your organization.
Getting Started
Create a New Organization
If you haven’t yet created an organization or want to add another one, you can find a guide here.
Add Administrator
In the Org. Details menu, you can add an administrator under Administrators. An administrator can manage this organization.

Only add trusted individuals as administrators who truly require these rights.
Create Tariff
Add a tariff to define the conditions under which charging can take place at your infrastructure. You can set up two tariffs per installation - one for public charging and one for private charging.

Power tariff
From 2026, various power utilities in Switzerland will introduce a new tariff component: the power tariff.
The power tariff means that charging an electric vehicle will no longer be billed solely based on the amount of energy (kWh), but additionally based on power (kW), i.e. the speed at which charging occurs.
You can correctly map the power tariff using the Sintio portal; the input field as shown below is used for this purpose.

You can find more information about the power tariff here (opens in a new tab).
Adjust tariff
If you would like to adjust the tariff of an installation at the turn of the year or for other reasons, please follow these steps:
-
Log in to the Sintio portal using your credentials.
-
Click on the organization in the upper left corner for which you have administrator rights.
-
Navigate to the Tariffs page to open the tariff overview.
-
Select Edit for the tariff you wish to adjust.
-
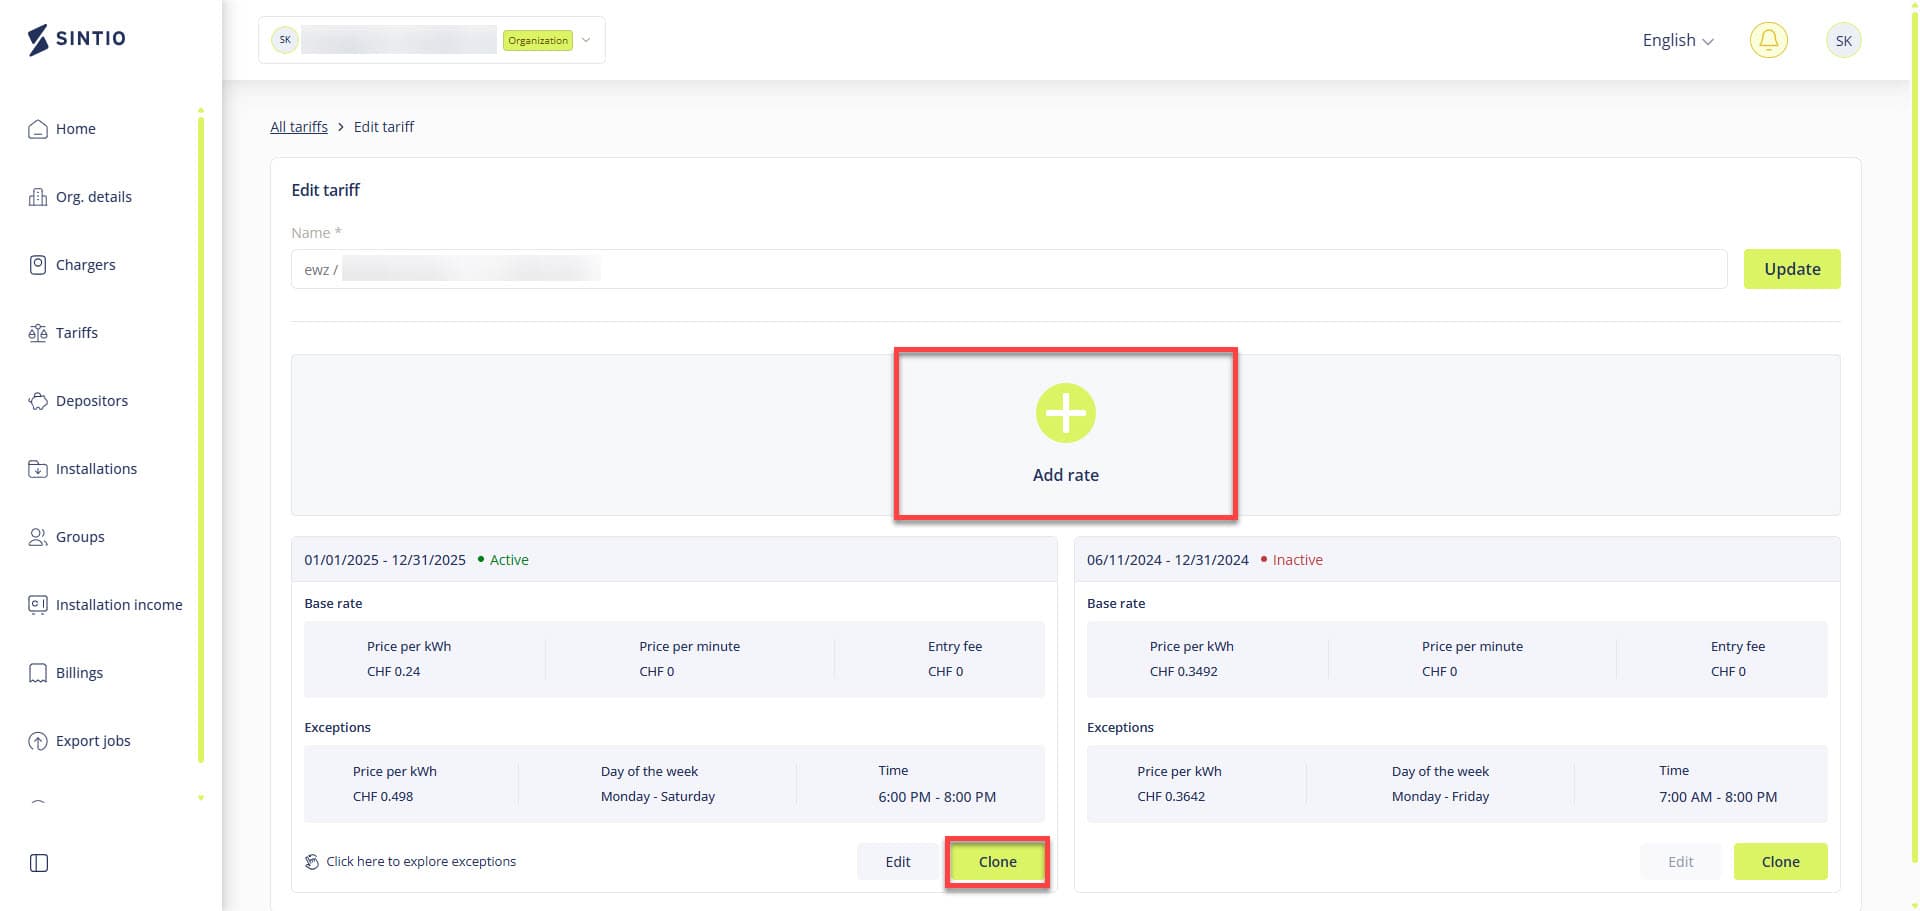
Clone the existing tariff or add a new price.
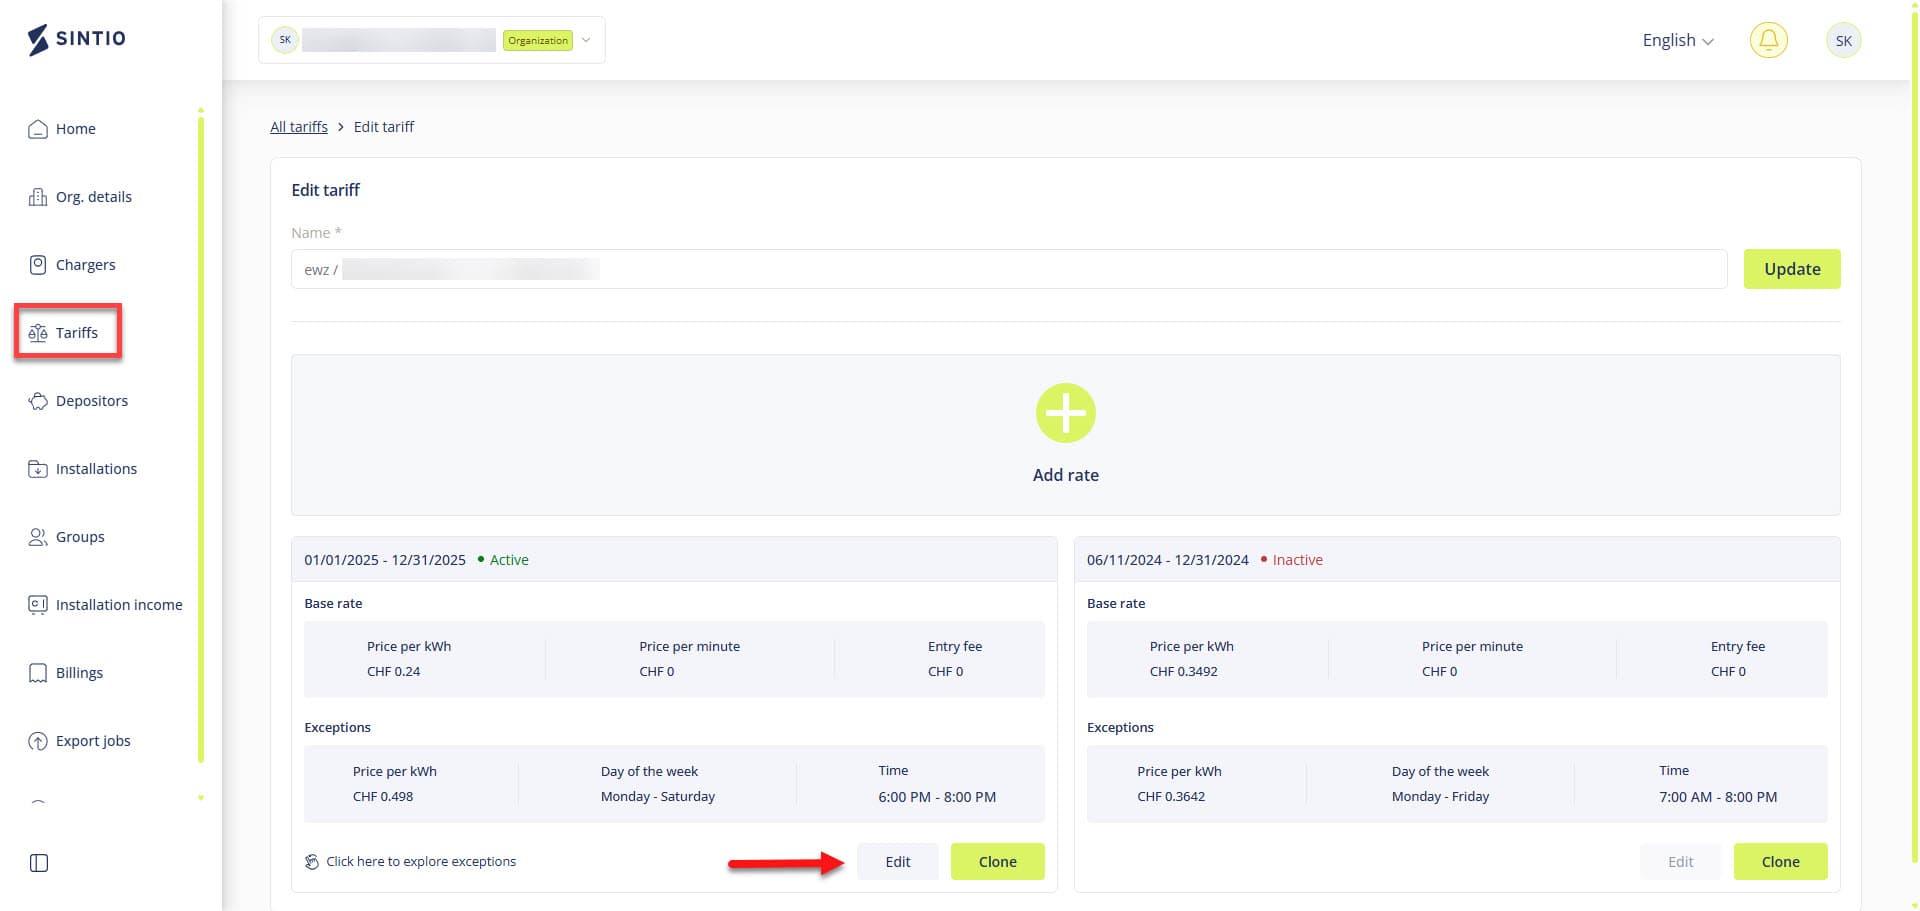
- End the active tariff by setting the desired end date.
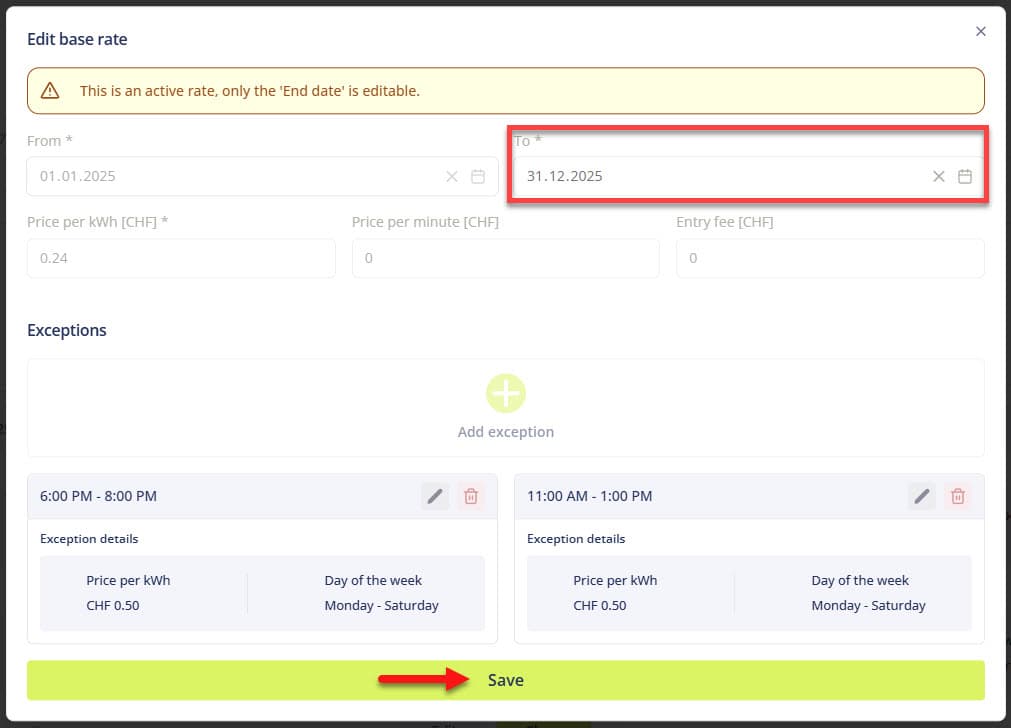
- Clone the existing tariff or add a new price.
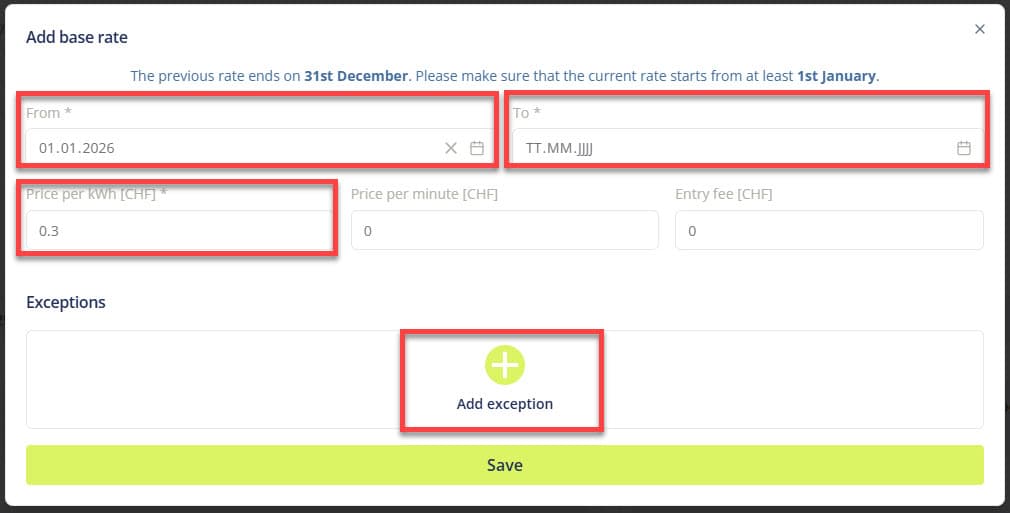
- Make the desired adjustments (e.g., date, prices, conditions) and save the changes using the option.
Add Installation
In the Installations menu, you can add one or more installations. An administrator can manage these installations.

Provide the following details:
| Field | Description |
|---|---|
| Name | Name of the installation, e.g., MFH Musterringen alte Landstrasse 1 |
| Physical location | Exact address as per Google Maps |
| Status | Operational or Inoperational |
| Public Tariff | Tariff for charging at the charger via QR code. This tariff must be defined first. |
| Private Tariff | Tariff for charging at the charger via Sintio account. This tariff must be defined first. |
| Depositor | Account where earnings from energy sales will be transferred. |
| Electric meter | Organization or Sintio |
| Charger manufacturer installation settings | URL for charger configuration. |
| Markup price [CHF/kWh] | Required surcharge to cover standby consumption, etc. |
Link Chargers
The linking of your charger depends on the manufacturer. Here you’ll find a list of all verified chargers.
Your charger model isn’t on the list? Contact us at support@sintio.ch. We integrate all OCPP-compatible stations.
Configure Charger
Once you have connected your charger(s) to the Sintio Portal via your OCPP URL, you can configure them.
You can directly assign chargers to an installation as shown below. You can also grant a user access to a charger; this user is then authorized to use it. The base fee is charged to the user who is assigned to the charger.
To assign a user to a charger, they must first have an account. You can find instructions here.


Click on your charger and then on the Edit button. You can adjust the following settings:
| Field | Description |
|---|---|
| Charger Name | You can freely choose the name. |
| Charger ID | Defined by the charger model and cannot be changed. |
| Installation Name | Assign the charger to an existing installation. Learn how to define one. |
| Status | Can be set to Active or Inactive. Inactive chargers cannot be used. |
| Access Type | Can be set to Private or Public. |
| Connector ID | If the charger has multiple plugs, you can select one here. |
| PIN | If the access type is Public, access can be secured with a PIN. |
| Group | You can optionally assign the charger to a defined group of users. |
Collections and Cash Flow
The costs for energy consumption are charged to users monthly. These revenues are used to pay the utility provider’s invoice, which is usually paid by the organization.
With the sintio.fullservice subscription, it is possible to transfer the power meter to Sintio AG. Once the meter is transferred to Sintio AG, the utility bills are paid directly by Sintio.
Utility Power Meter
The utility power meter measures all electricity consumed by the chargers. Based on this, the utility company issues an invoice for energy consumption.
Property Management Pays the Electricity Provider’s Invoice
Navigate in the menu under Installation income to trigger the monthly refunds. The refunds are triggered per installation and transferred to the designated depositor at the installation level.
To successfully trigger a reimbursement, an account holder must be correctly registered for the installation. Here you can find instructions on how to add an account holder.

Sintio Pays Utility Bill Directly
In this case, Sintio AG assumes responsibility for tariffs and pays the utility bill. You do not need to trigger reimbursements.
Want to transfer the meter to Sintio AG? Contact us at info@sintio.ch.
Export Jobs
Navigate to the Export Jobs menu to manage existing export jobs or create new ones.

Define your export job in three steps:
- Configure Export

| Field | Description |
|---|---|
| Frequency | Frequency of the data export |
| Data Type | Data can be exported per charger or per user |
| Interval Length in Days | Number of days covered by the export, counting backward from the end date |
| Transaction Type | Can be defined as private and/or public |
| Offset | Number of days back from today to set as the end date (1–25 days). Example: 1 = up to yesterday. |
| Export Format | Select the required export format |
Your desired export format is not listed? Contact us at support@sintio.ch.
- Tariff & Server Configuration
Depending on your selected export format, you can enter tariff details and optionally an FTP server. You can always download the data from the Sintio Portal.

- Link Chargers to Export Job
Select all chargers that should be included in the export job.
